Virgina Water - Long Exposure Photography
Virginia Water Walks - 300 seconds, f4.0, 17mm(f/4 USM), 100 ISO
Very often its knowing what you can do with the equipment you have that dictates how you take a photograph and what recipes you use for retouching. In some ways you pre-visualise what you expect to achieve before you click the shutter. Ansel Adams was a fantastic exponent of pre-visualisation, but often its about how you 'feel' on the day and what you want from the final effect that drives you towards the results.
The original file..
If we take a look at the original file, its clearly dark and underexposed, purposefully so, I wanted to hold the detail in the light areas just above the horizon. It was shot at 9:42pm and the day had been a cloudy one. A blustery day aloft created movement in the cloud which I wanted to capture using a Pro ND1000 filter. All was relatively calm at lake-level. I had already shot a test frame for exposure on my Canon 5D MKIII and I use Photo Pills to judge an exposure with a 10-stop ND Filter.

An evenly balance histogram is a must..
The original exposure was about 1/3 second at f/4, 100 ISO. Photo Pills told me that I was looking at a 5 minute exposure. I was using histogram information for Highlight and Shadow clipping which I find on the back of my camera after the exposure. What that tells me is that I am retaining detail in the highlight and shadow. So whilst it looks like a poorly exposed image, the histogram doesn't lie! I could have potentially opened up about a stop but after 5 minutes of exposure i wanted to avoid any more unnecessary noise in the file.
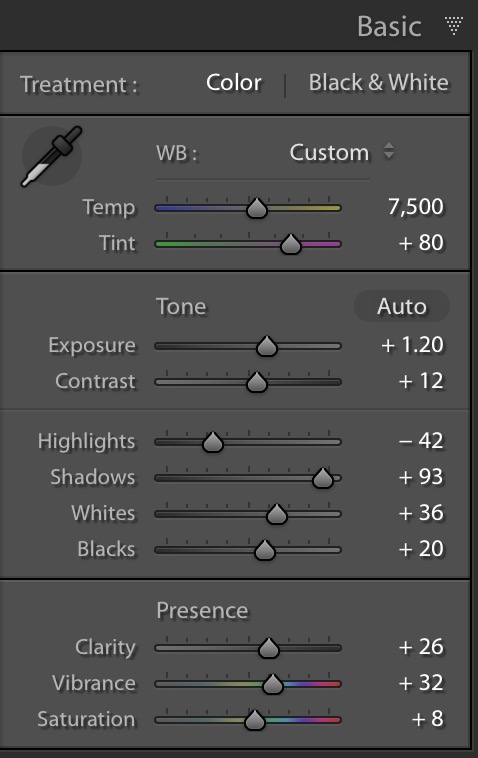
Basic and initial retouch to retain as much detail in shadow and highlight.
Opening the file in Adobe Lightroom, the conventional wisdom of the retouching process is that we pull down the highlights and open up the shadows but once again it is really down to the shot we are presented with. In my mind I wanted to add more colour into the shot and since the histogram told me that the highlights had held quite well there was no real need to add anymore highlight detail.
I added some exposure to brighten the shot overall and adjusted contrast globally and with my white and black points. Clarity is something you either love or hate, for this shot I added some to enhance the overall impression of sharpness but mainly help separate the tones in the cloud.
A few adjustments in the tone curve in the highlight continue to help separate the lighter areas of the shot. Because the shot was quite dark the green tone in the trees tends to be suppressed so I used the luminance slider in the greens just to give the tree their colour back.
I am always amazed at the ability of the Canon 5D MKII to create such sharpness in the image, perhaps its the 17-40mm f/4 but with a due to the long exposure the image was reasonably noisy so at the expense of sharpness I dialled out much of the noise. Also masking the sharpness is something I like so that we are not sharpening noise but keeping the silky smooth clouds, silky smooth!
Most of the colour work was done using graduated fills, radial filters and brush filters. In Adobe Photoshop I made a final colour correction adding some "Screen" Blend modes in full colour to tweak colour further.
If you are interested in purchasing this image, please visit the Store